It's been a few days since I posted my series on decorating for Halloween frugally. I would LOVE to see pictures of how it turned out!! So much so, that I'm starting a new contest!! That's right, not only did you get decorations for free or close to it, you'll win something out of it!!
Please email me pictures of your "haunted houses". I will host a picture gallery, then annouce a winner. In the comments, let me know you're entering and if you enjoyed the series. Should I do more like it?? And was it fun for your children, too?? I'd love some feedback!
The prize will be announced in the next few days. I am out of town, and doing this on a time-limited computer!! Thank you everyone!
-Lisa
Showing posts with label Halloween. Show all posts
Showing posts with label Halloween. Show all posts
Wednesday, October 22, 2008
Sunday, October 19, 2008
Part 3: Cottonball Creepy Crawlies
I'm sure many of you remember making spider webs "the old-fashioned way", besides collecting spiders and having them do it! I'm talking about using cottonballs. Just unroll them, and gently spread the cotton out! Best thing about this decorating idea is that most of this stuff you will already have!!

1. Gather your materials: large cottonballs, 4 toothpicks for each spider, black paint, redish fingernail polish and double-sided tape.

2. Put some of the black paint on a paper plate or even a regular plate. It will wash right off (just clean it in a reasonable amount of time). Leave to dry.

3. Unroll the cotton ball.

4. Find a home for your web. Bricks work great because the cotton snags on it. If you don't have brick, use the double-sided tape to hold the web in place.
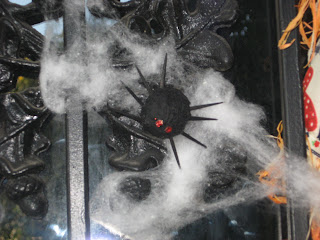
5. Break the toothpicks in half. Stick each piece in the cottonball body. Four on one side and four on the other. Using the nail polish, paint 2 eyes on the spider. Place the spider in its new home; you may need to secure it using the tape.
And there you have it! Spiders and webs. What did this cost me?? NOTHING!
HAPPY HALLOWEEN!
1. Gather your materials: large cottonballs, 4 toothpicks for each spider, black paint, redish fingernail polish and double-sided tape.
2. Put some of the black paint on a paper plate or even a regular plate. It will wash right off (just clean it in a reasonable amount of time). Leave to dry.
3. Unroll the cotton ball.
4. Find a home for your web. Bricks work great because the cotton snags on it. If you don't have brick, use the double-sided tape to hold the web in place.
5. Break the toothpicks in half. Stick each piece in the cottonball body. Four on one side and four on the other. Using the nail polish, paint 2 eyes on the spider. Place the spider in its new home; you may need to secure it using the tape.
And there you have it! Spiders and webs. What did this cost me?? NOTHING!
HAPPY HALLOWEEN!
Saturday, October 18, 2008
Part 2: Cereal Box Cemetary
So you scored some great deals on cereal. With the cost of cereal getting ridiculously high for air and sugar filled puffs, and milk costing more per gallon than gas, it's good to get all you can out of it! So here's my plan for you...


Making Cereal Box Tombstones
1. Put rocks, sand, rice or other "heavy" substance in the box to anchor it. Glue the open end of the ceral box closed. You could tape it, but the paint make not stick to it.
2. Paint the box with black paint: acrylic or spray paint. It doesn't even have to be solid black. Mine is a deep brown with navy blue. It gives it a little more depth than black. But then again, I couldn't find my black paint, so I just used what I could find!! Let it dry.
3. Paint on an epitaph with white paint. Use clever names like this one: Lota Bones. (lot of bones, lol). You can even water down the paint a little and with the box standing up, paint RIP. The watery paint will run, making it a little creepier...
4. Make several and place throughout your yard. If you don't have anything to put in the bottom of the box, tape a sharpened pencil to the back, with half of it protruding past the box, and stick it into the ground.
Remember these won't be waterproof!!
Subscribe to:
Posts (Atom)